


| Genre: | Two Player Only; Overhead Maze |
| Publisher: | Proaction |
| Machine Compatibility: | BBC Model B, BBC Model B+, BBC Master 128, Acorn Electron |
| Release: | Never released. Recovered on 5.25" Disc |
| Available For: | BBC/Electron |
| Compatible Emulators: | BeebEm (PC (Windows)) PcBBC (PC (MS-DOS)) Model B Emulator (PC (Windows)) Elkulator 1.0 (PC (Windows)) |
| Original Release Date: | |
| Original Release Price: | Unknown |
| Box Type: | Not a physical item so no box |
| Author(s): | Ian Webster & Frazer Middleton |
Variant Items
There are 0 other items featuring this same game (that we know about!). Click any of them for their details.
Active Auctions
Closed Auctions
Buy It
Unfortunately no-one is currently selling this item.
Auction Price Watch
Worried you're being ripped off? Closing prices on eBay can help you decide what a reasonable price is for a particular item.
Uggie's Garden

Electron User Group
1st April 2001
A very clever twist on the Repton theme, injected with some new ideas and an incredible suite of editing facilities. Read Review
Full Instructions
Introduction
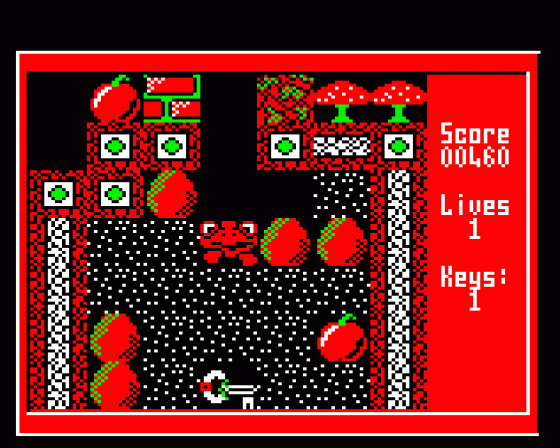
Uggie's Garden - a two-player only, split-screen adventure in the style of the Repton series of games featuring large, detailed sprites.
Use items, monsters and friends to assist you in completing all twenty levels - then design your own, with the sophisticated sprite and screen editors!
Compatible with the BBC B, B+, Master 128 and Electron computers.
Loading
You must select either the game or editor from the first loading screen with keys 1 or 2.
Note that each screen for Uggie's Garden loads in separately. Therefore, if playing from cassette, note the reading on the cassette's counter for the beginning of each screen file.
How To Play The Game
Uggie lives in a garden where he picks apples from his orchard. Helping Uggie is his friend Bill, but beware, a monster lives in the garden who will try to eat them up!
Also, beware of your friend... He may try to kill you and pinch all the apples for himself!
You must make your way around the garden collecting the apples while avoiding the poisonous mushrooms and Uggie-eating plants. Dangerous boulders litter the garden and may fall and crush you! Doors bar your way and you must find keys to open them.
You must also make sure your 'friend' does not wake up the monster and set it upon you!
And don't forget to chop down the trees to get more apples!
Game Controls
| Left | Right | Up | Down | Suicide | ||
|---|---|---|---|---|---|---|
| Player 1 | : | Z | X | F | C | 1 |
| Player 2 | : | < | > | * | ? | 0 |
COPY/DELETE - Pause/Resume, Q/S - Sound Off/On
From the high-score table:
L - Load Master File, P - Enter Password, SPACE - Play Game
Game Character Descriptions:
Uggie ............................... Player One
Bill ................................ Player Two
Boulders ..... Fall and crush you if unsupported
Walls .......................... Block your path
Invisible Exits ..... Walls you can walk through
Door .............. Only opens if you have a key
Key ............. Collect and use to open a door
Monster ...................... Deadly if touched
Monster-Pellet
: Green ......... Causes monster to pursue Uggie
: Red ............ Causes monster to pursue Bill
Monster-neutralant Pill ...... Paralyses monster
Apples .......................... Collect these!
Plants ................................ Kill you
Plant-spray .... Kills all plants (when touched)
Earth ..... Supports boulders. Walk through this
Mushrooms ............................. Kill you
Trees ...... Obstruct. Chop down for more apples
Axe ........ Chops down all trees (when touched)
Note that you require one key per door. Each key disappears after it has been used. Plan your strategy so that you are not prevented from continuing by a locked door. Any player alive when the last of the apples is collected will progress to the next screen.
Should you complete Uggie's Garden, we'll organise a signed congratulatory certificate for you. You'll also be sent a software reward in the same sae.
How To Use The Editor
In common with most games of this sort, Uggie's Garden features a full editor package. This sophisticated utility allows you to redesign almost every aspect of the game. You can redefine the sprites, game colours, level maps and even the small map icons to create your own fiendishly puzzling suite of screens.
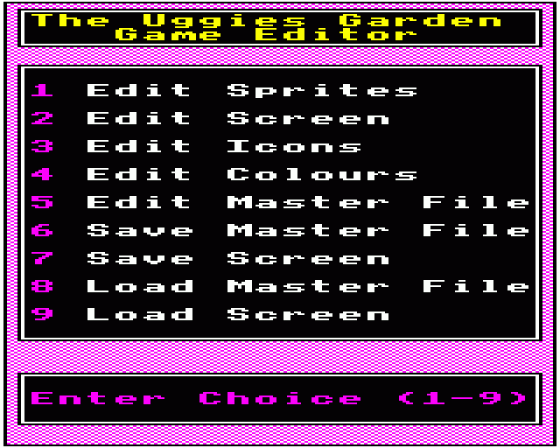
To load the editor, select 2 from the loading screen Menu. After the Editor has loaded, you will be presented with the following screen:

Each number corresponds to the stated function and listed below are the specific instruction for each. Note that the default (familiar) sprites and map icons of Uggie's Garden are already present in memory. However, as with the game itself, you must load in a particular screen separately in order to edit it.
If you have used a similar editor, such as that of the REPTON series, you are likely to find the Menu self-explanatory. If not, you will find the following tutorial useful.
Option 1 : Edit Sprites
Selecting this option allows you to either create a whole new series of game sprites or simply modify the original ones. The sprites are part of the "Master File", explained below. However, this does not concern us yet as the original Uggie's Garden sprites (with which you will be familiar through playing the game) are present in memory when the editor has loaded.
On pressing option 1, the Menu disappears and is replaced by the following screen:
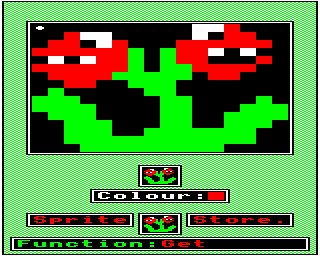
The top window gives an enlarged image of a chosen sprite for pixel-perfect editing.
The smaller window shows the actual size of the above sprite.
The box labelled 'Colour' gives the currently selected colour.
To "Store" is selectable (See below).
The 'Function' gives the action to be performed upon a sprite selected from the store
To operate the sprite editing facilities is simplicity itself. Notice that the "o" cursor can be navigated (within the Edit Sprite window) with Z, X, * and ? and that pressing SPACE places a dot at the location of the cursor. The currently selected colour, shown in a horizontal bar in the centre of the screen, can be altered with the keys 0, 1, 2 and 3. (You may want to use different colours the default ones - changing these is done via option 4 of the Main Menu.)
As you make changes in the Edit Sprite window, you will notice that the equivalent pixels in the smaller window beneath it display the sprite actual size (as it will appear in the game). The beauty of the Uggie's Garden editor over some of those in other packages is that the activity in the Edit Sprite window does not affect any sprite which has already been created until you specifically "overwrite" the particular sprite.
To demonstrate this, use the keys < and >. The box between "Sprite" and "Store" will cycle all of the sprites which can be edited, or that you may choose to "overwrite" with a new sprite you have created in the Edit Sprite window. The first sprite is one of a blank space. Although you are free to experiment with this sprite, altering it from this state is not recommended as it is will cause strange effects when you come to test your finished screen.
Assuming you haven't yet created a masterpiece in the Edit Sprite window, you can "blow up" any of the sprites in this "store" (to edit their pixels) by pressing RETURN. This executes the currently selected "function" shown in the bar at the bottom of the screen. For retrieving a sprite from the "store" the function is "Get".
The sprite will now appear enlarged in both the Edit Sprite window and the actual size window beneath it. You can make any changes you wish to it with the movement keys and SPACE without affecting in any way the "stored" version. You can also choose to subject it to other functions (described below) before you decide to store it again.
Note that you must understand the properties of each sprite and their position in the cycle as you cannot define the properties yourself. So to create a deadly, immobile, animated sprite, you must overwrite the two "plant" definitions with your own sprites. If you do not, you will end up with weird effects when selecting the Animate function and in the finished game itself.
Functions
To scroll through the functions available, use the keys N and M. The following list gives the action each function performs.
| Get | Gets whichever sprite is displayed in the "store" window, and transfers it to the Edit Sprite window. Throughout editing, the original sprite is untouched |
| Store | Stores the sprite in the Edit Sprite window 'over' whichever sprite is displayed in the "store" window. This is the only option that changes a "stored" sprite |
| Clear | Clears the Edit Sprite window |
| Mirror X | Flips the pixels in the Edit Sprite window vertically |
| Mirror Y | Flips the pixels in the Edit Sprite window horizontally |
| Inverse | This maps all colour 0 pixels to colour 3 and all colour 1 pixels to colour 2, but only on the Sprite to be Edited. You may use this function to make a sprite appear "highlighted" or "outlined". Selecting the option a second time naturally restores the colours to as they were |
| Change | Changes all of the colour beneath the cursor to the currently selected colour. So to change all the red pixels to green ones, select green, move to a red pixel and press RETURN |
| Merge | Merges the sprite displayed in the "store" window with that in the Edit Sprite window |
| Animate | This option, only applicable to the "character" sprites - Uggie, Bill, the plants and the monster - flips between the appropriate two sprites to show if the persistence of vision effect makes the characters appear to 'move' |
Hint
Especially when creating animated sprites, you can create one sprite and store it over the two appropriate positions in the "store". In that way, the minor modifications you make to the second sprite make it quicker to create.
To leave the Edit Sprites section, press ESCAPE. You will be returned to the Main Menu.
Option 2 : Edit Screen
To edit an existing screen, it is first necessary to use option 9 to load it into memory. If this is not done, pressing this option will display a empty space 'map' bordered by walls and mushrooms, allowing you to create your own screen from scratch.
As with the Sprites Designer, you control a small cursor 'o' which is situated in the top left hand corner of the map display area. Extreme bottom left is displayed the "currently selected sprite". The designing process is carried out by 'move and drop'. You move with the Z, X, * and ? keys and drop with SPACE.
Also as with the Sprites Designer, you can use keys < and > to select which sprite you wish to place. As you do so you will notice that not only does the "currently selected sprite" box change but so too does the cursor; it becomes an smaller version of the sprite, known as an icon. By using such icons, it is far easier to design the map fully on screen.
You may place any character in any place within the area shown on screen and should aim to create small puzzling areas which need to be conquered to gain, for example, a key, before moving onto the next. Let your imagination run wild!
To alter a particular icon, simply move the cursor over it and press DELETE, or 'drop' an alternative icon on top to it.
Note that you can only place one monster, Bill or Uggie icon on each screen. Note also that the border should not be altered as it exists to prevent a player from running off the side of the screen!
When you have finished designing your screen, press ESCAPE to return to the Main Menu. Screens are saved individually with option 7.
Option 3 : Edit Icons
Selecting this option allows you to either modify or create a whole new series of icons to complement any new sprites you have defined. These icons will form part of the "Master File", explained below. Note though that, unlike the sprites, the icons themselves are not displayed during the gameplay of Uggie's Garden. They are purely for your benefit in designing Screens via option 2.
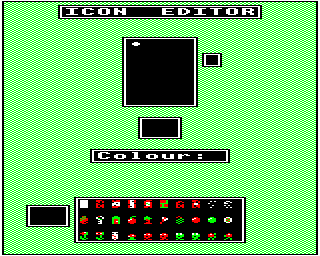
On pressing option 3, the Menu disappears and is replaced by the following screen:
|
||
| <--- | Gives an enlarged image of a chosen icon; smaller box shows it 'map size' | |
| <--- | Shows the icon selected by the second cursor |
|
| <--- | Gives the currently selected colour | |
| <--- | Left: The sprite the icon represents Right: The thirty icons selectable | |
Editing icons features two cursors, represented above by a circle ("o") and a square ("O"). The "o" cursor is navigated within the Edit Icon window with the Z, X, * and ? keys while SPACE places a dot of the currently selected colour at its current location. As with the Edit Sprite option, the colour is shown in a horizontal bar in the centre of the screen and can be altered with the keys 0, 1, 2 and 3. (See option 4 for changing the default colours.)
The second cursor "O" is navigated within the icon store with the cursor keys. Using these, particular icons can be "got" or "stored" (replaced) over others in a similar way to the Edit Sprites option. For example, you may design the icon of a new main character to replace Uggie in the Edit Icon window either by:
- moving the "O" cursor to the Uggie icon, pressing G (to "Get" it and bring it into the Edit Sprite option), altering it to suit and then pressing S (to "Store" it over the old Uggie sprite), or:
- simply designing the new icon in the Edit Sprite window, using the cursor keys to move the "O" cursor over the Uggie icon then pressing S.
Once again, the icon you are currently working on will not "overwrite" any of the stored icons until you specifically request that it does so.
Option 4 : Colour Editor
This option alters the default colours. As Uggie's Garden is a Mode 5 game, only four colours may be present on screen at once. However, you may like to change these colours to suit your new sprites and icons. To do so, press 4 from the Main Menu.
The screen will clear and display the sprites currently in memory to aid experimentation. Press keys 0 to 3 to advance the colour of that number through the sequence:
Black -> Red -> Green -> Yellow -> Blue -> Magenta -> Cyan -> White -> Black -> etc
Press ESCAPE to store the colours and return to the Main Menu.
Option 5 : Edit Master File
Uggie's Garden saves individual screens separately and holds all other information (Passwords, sprite and icon designs and number of screens) in a Master File. The Master File for the default screens of the game is built into both the Game and the Editor. However, you will need to change a few of its variables for optimum performance with your own saved screens and sprites.
Select option 5 and you will be presented with the following information, plus the defined sprites and icons which will form the Master File:
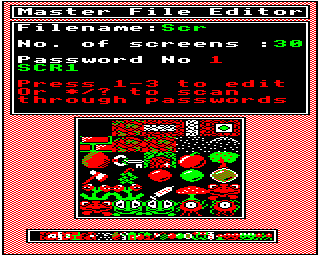
Filename (Press key 1 to edit this)
This is actually the prefix to the name of each screen and it, and the number of the screen you have currently reached when playing the game, form the filename for the screen it searches for. So, for example, when you first play the original Uggie's Garden, "Scr"+"1" is searched for ("Scr1"). Each successive screen completed adds 1 to the screen number until the value in "No. of screens" is reached whereupon you are given a congratulatory message and the game ends.
If you create a set of sprites based on 'Alice In Wonderland' you may like to type 1 and alter "Scr" to "Alice" and save screens (using option 7) as Alice1, Alice2, etc.
No of screens (Press key 2 to edit this)
The Master File must specify the number of screens to be completed before the player has won. It may be any value. If you simply want to test the screen you have created, press 2 and set it to 1.
Password (Press key 3 to edit this)
Each screen requires a password. All passwords for all screens are stored in the Master File, so the Game Menu can detect if any given password is valid, and then detect which screen that password is for and load it.
To view the passwords for each screen, use the * and ? keys. The password will flick either up or down. When you have detected the screen for which you wish to enter or change the password, press 3.
Option 6 : Save Master File
This simply saves the information created by option 5 to disc or tape. You will be asked for a filename and whether or not you wish to "Lock" the file. Only type Y if you are sure you will not need to alter the Master File at a later date.
At first glance, this process may appear awkward as it results in two separate files (the Master File followed by the Screen the player has reached) needing to be loaded into the Uggie's Garden Game. However, as the Master File does only need to be loaded once it soon feels natural.
Important Note
A Master File does not hold the data for the Screen you have designed. Use option 7 to save the screen.
Option 7 : Save Screen
This will save the current screen in memory (each one you have loaded or designed) to tape or disc. You will be asked to enter a filename and should ensure that it begins with the prefix stated in the Master File followed by the appropriate number. (eg. Scr1)
Option 8 : Load Master File
This option allows you to load in a previous Master File (or that of the original Uggie's Garden game itself). Enter the filename and make changes to it with option 5.
Option 9 : Load Screen
This will allow you to load in any screen from disc or tape to make changes to it. Type in its filename (eg. Scr1) and, after loading, alter it with option 2.
Testing A Screen
The steps you must go through to test your own masterpieces are:
- Load the Uggie's Garden Editor
- Create a screen (using option 2)
- Design alternative sprites if necessary (option 1)
- Design alternative icons if necessary (option 3)
- Alter the default colours if necessary (option 4)
- Create a new Master File (using option 5), specifying the "prefix" of the filename, the number of screens (1) and the password for that 1 screen
- Save the Master File (using option 8)
- Save the screen (using option 7)
- Press BREAK
- Load the Uggie's Garden Game
- Press F to load the Master File (after inserting your own tape/disc with the saved files on)
- Press SPACE to commence playing, or 'P' followed by the password for the test screen
- Wait for that screen to load
- Ensure the screen can be completed
To develop a set of screens is then just the simple matter of increasing the number of screens and passwords in the Master File by 1 and using option 7 to save further screens with the suffixes 2, 3, 4, etc.
Finally, if playing from disc, always use a blank formatted disc for experimentation of this kind and never use the original.
Screen Designers
The following utilities are also available to allow you to edit the supplied screens of this game:
Cheats
Download
A digital version of this item can be downloaded right here at Everygamegoing (All our downloads are in .zip format).
| Download | What It Contains |
|---|---|
| A digital version of Uggie's Garden suitable for BeebEm (PC (Windows)), PcBBC (PC (MS-DOS)), Model B Emulator (PC (Windows)), Elkulator 1.0 (PC (Windows)) | |
| A digital version of Uggie's Garden suitable for BeebEm (PC (Windows)), PcBBC (PC (MS-DOS)), Model B Emulator (PC (Windows)), Elkulator 1.0 (PC (Windows)) |
Report A Problem
We thank you from the bottom of our hearts if you report something wrong on our site. It's the only way we can fix any problems!
You are not currently logged in so your report will be anonymous.
Add Note
Release Country
Change the country to update it. Click outside of this pop-up to cancel.
Scan Of Selected Article
If you auction an item, it will no longer show in the regular shop section of the site.


