Alternative Games Called Calligraphy
| Genre: | Utilities |
| Publisher: | Acorn User |
| Cover Art Language: | English |
| Machine Compatibility: | BBC Model B |
| Release: | Professionally released on 5.25" Disc |
| Available For: | BBC Model B |
| Compatible Emulators: | BeebEm (PC (Windows)) PcBBC (PC (MS-DOS)) Model B Emulator (PC (Windows)) |
| Original Release Date: | 14th May 1987 |
| Original Release Price: | Unknown |
| Market Valuation: | £4.00 (How Is This Calculated?) |
| Item Weight: | 98g |
| Box Type: | 5.25" Disc(s) Celophane |
| Author(s): | Mike Turner, George Yetts, Wallace Nicoll & Brian Jaques |
Variant Items
There are 0 other items featuring this same game (that we know about!). Click any of them for their details.
Active Auctions
Closed Auctions
Buy It
Unfortunately no-one is currently selling this item.
Auction Price Watch
Worried you're being ripped off? Closing prices on eBay can help you decide what a reasonable price is for a particular item.
Full Instructions
1. Introduction
This software package is an enhanced version of the Calligraphy programs originally published in the September 1986 and May 1987 editions of Acorn User magazine. The programs allow you to design text fonts on a grid 24 pixels wide by 32 pixels deep, and print them to an Epson-compatible dot-matrix printer. A selection of fonts are already supplied on the disc.
The programs can be used for many purposes. For example, you can create your own letterheads, or handbills, menus, price lists and so on; in fact, almost any display lettering. You can add ordinary size computer text and graphics to the page, giving you a simple desktop publishing facility. Or you might like to combine traditional and modern methods, and print out your headlines and your ordinary text (known in publishing as 'body copy'), followed by the traditional scissors and glue, and finally use a photocopier to produce multiple copies of your publication. Section 6 of this manual gives you some hints on doing this.
The principal enhancements over the program as originally published are improved speed of response on the font designer, a preset selection of fonts, including extra wide ones, and to read Wordwise files as well as those from View.
The rest of this manual covers starting up the disc, the font designer, the printing program, the fonts supplied, and finally some desktop publishing tips.
2. Using The Disc
The Calligraphy disc supplied is in 40 track DFS format. If you have a 40-track disc drive, place the disc in your drive and press SHIFT-BREAK. This means holding SHIFT down, then pressing BREAK, releasing BREAK, and only then releasing SHIFT. A title screen will then appear with a menu asking if you want to design fonts, or print text. Press D if you want to design fonts - instructions are in Section 3 - or press P if you want to go straight to printing - see Section 4.
80 track disc drives
If you have an 80 track disc drive, format a blank 80 track disc. Put the 40 track masters disc in your 80 track drive 0, and type:
CHAIN "COPY40" (RETURN)
The program will ask you which drive the 80 track disc is in. If you have dual drives, put the blank disc in Drive 1 and answer "1". The transfer will then happen. Afterwards, put your master disc away, and label the new copy. You can then use this as normal.
If you only have a single drive, answer "0". The program will prompt you to swap discs. When it refers to the "40 track disc", it means the master disc you have bought. The "80 track disc" is your blank disc.
If you have a BBC B with 1770 DFS, BBC B+ or Master 128, you can use the 40 track disc directly in 40 track drives by typing:
*DRIVE 0 40
or you can use the COPY40 program described above.
Printers
The program works with Epson and Epson-compatible dot matrix printers, which suppose the ESC "L" control code for dual density graphics, and the ESC "A" command for setting line spacing. As far as we know, all Epson-compatibles, are identical in this area. Note that laser printers offering Epson emulation do not usually emulate graphics.
3. The Font Designer
The font designer is loaded by pressing D from the front menu, or if you wish, by typing:
CHAIN "DESALET" (RETURN)
from the BASIC prompt. Note that the program run with a PAGE setting higher than &1100, and it automatically adjusts for this when loading. First of all you are asked if you want to clear currently memory. If you answer Y, any current font definitions will be deleted. This is necessary if you are going to start designing a new font. If you are going to load an existing font straight away, you might as well answer 'N', because loading a font automatically clears memory, and continue editing a font, press 'N', and the current font should still be present in memory.
Cursor:
The four cursor keys allow you to move round the grid, to select pixels to set and clear.
SPACE
Sets a pizel.
DELETE
Clears a pixel.
G
Retrieves a character for editing.
M
Saves an edited character to memory (not to disc!)
V
Produces a small scale version of the character
S
Saves the entire character set to disc
L
Loads a new character set
W
Deletes the entire character set
CTRL+@
Exits the program
*
Allows you to type * (star) commands
To produce a new font, you will first need to have an idea of the designs you wish to make. Then start the program, answering Y to clear memory. You can immediately start to design your first character which should normally be the ! character, ASCII 33. Using the cursor keys, and SPACE and DELETE, design your exclamation mark. When you are satisfied, press M to store the character in memory, followed by a keypress indicating the character you wish the design to be stored as i.e., if you have just designed an A, press the A key (with SHIFT as it's a capital). For lowercase letters, make sure the CAPS LOCK light is off. The program asks you for the number or rows that you wish to save. Calligraphy produces proportionally-spaced text, and to do this, must know the different widths of each character. The answer you should give should be the rightmost column that contains dots plus oe for inter-letter spacing. Your design should be started from the leftmost column on the grid.
You may then proceed to design the next character. Either delete all the unwanted pixels, or clear the grid in one go by typing G to get a character, and typing the next character you are going to design. This should be blank if you correctly claimed memory at the beginning. Press M again at the end.
Continue like this through the entire ASCII set up to character 126, the tilde (~). This is a long job, and you're unlikely to be able to create the whole dot at one session. When you've done enough, press M to save your final character, and when "Choose from Menu" reappears, press S to save your character set. It doesn't matter that it's incomplete, you can still reload it at a later date, and carry on ehere you left off. To do that, you would enter the program, and immediately press L to load your unfinished set. Then start designing. If you've forgotten where you're up to, you'll have to examine the various letters (with G) until you find blanks.
There are two important shotcut methods to use when designing fonts. The first is that many designs are variation on other designs, and it's far quicker to load in an existing font, go through and alter it, and re-save it under another name., or can be built from compositions. For example, c can be formed by cutting a piece from o, p and q, d and b, i and j, and so on, can be designed with only one lot of effort. To design a c starting with an o, press G, followed by lowercase o, then alter it, then press M followed by lowercase c.
Note that when saving new fonts, you can of course specify a filename such as ":2.F.New", which will save the file on Drive 2. Also you can change drive, or filing system, by using the *DRIVE command, accessed by typing * from the DESALET menu.
4. The Printing Program
The second part of the Calligraphy program is the text printer. This takes either ordinary text files, or direct keyboard input, and prints it out on your Epson-compatible printer, using a specified font. The program can deal with limited formatting commands, i.e. left justification, right justification, and centring.
To use this program, you must have a font ready to use on the disc, and also either have your text to hand, or in a disc file. the program is started by pressing 'P' from the main menu, or typing
CHAIN"MODICAL"
directly from BASIC. On booting, the program initially asks you for the filename of the font you want to use. This must be a file that you have created with the font designer, or one of the standard fonts supplied with the system. If you aren't sure what fonts are available, type:
*CAT
and you will get a catalogue. Any * command can be typed, so you could also change drive at this point. Note that MODICAL only makes a cursory check to see if a file loaded is indeed a font file, so don't load non-font files into the program!
The program then checks the font, and displays a list of the characters available. Not every font has every character, it all depends on what you have designed. If you try to print a character that is not in the font, a space will be substituted. So if you see blank spaces in your output, the first thing to check is that the missing character actually exists on the font in question.
You are then asked if you wish to print from an existing file, to which you reply Y for yes, or N for no. Printing from an existing file means taking a text file, which could be created with MODICAL, or with Wordwise, View or any other text editor, and printing it. Each is documented below.
Wordwise
Create your text file in the normal manner. Your lines must be 40 characters or less, which is easy to gauge, as you are working on a 40-column screen. You *must* press RETURN at the end of each line, which is not the way you usually work with Wordwise. You can only have 22 lines of text. Any excess will be ignored by MODICAL. If you want formatting, use the formatting commands LJ, RJ, CE and MS as described below. Do not try and use any other Wordwise-embedded commands, as they will spoil the output. For example, you do need an LM39, as you are pressing RETURN at the end of each line.
The formatting commands should be inserted in the normal way, i.e.
<f1>RJ</f2>This is right justified
and the RJ command will appear in green, with the rest of the line in white. The formatting commands must immediately follow a carriage return, that is they must be on the start of a line. When you have produced your text, save it from the Wordwise menu as normal.
View
You must set your rules to 40 columns or less. The simplest way to do this is to type:
=>MODE7
=>NEW
at the command prompt. Also justification must be turned off. In Edit Mode, press CTRL-f3 to remove the J from the top left hand corner of the screen. Text may then be entered as normal. Press RETURN if you need to, or let VIEW break your lines. Don't use TABs or other formatting commands, as MODICAL won't recognise these. You may use the four formatting commands (see below), by inserting them in command margin. Press SHIFT-f8, and then type the command. When you have finished, SAVE your file as normal from the command screen.
Formatting Commands
There are four formatting commands recognised by MODICAL. These must be on the start of the line, and only one command per line is recognised.
CE
This centres text on the printed output. It is configured for the full width of an 80-column printer. Note that centring proportionally spaced fonts is a complex business, and trying to insert your own spaces instead of this command may not produce the desired results. Also, if the line to be centred contains any trailing or leading spaces, the effect will not work properly. The CE command stays in force until another formatting command is used.
LJ
This left-justifies the text. This is the default condition, but the command must be explicitly used to restore left justification after one of the other commands.
MS
This 'makes equal space' between the words on the line, effectively giving right justification. If you are using this command, make sure that your lines are almost a full page in width, otherwise excessive space will appear between letters.
RJ
This right-justifies the text, inserting extra spaces at the beginning of the line.
The MODICAL Editor
You can enter text directly into the MODICAL program without previously using an editor. The program will accept up to 22 lines of text for printing. To use this facility, answer 'N' to the 'Print existing file prompt' and you will be asked how many lines of text you wish to print. A reminder is displayed, from which you will see that the keys f0-f3 will generate codes LJ, RJ, CE and MS respectively.
After entering the number of lines, you are prompted for each line of text. Don't worry about the text spreading over lines on screen. It will all come out right on the printer.
When the required number of lines have been typed, the message 'Page completed' appears, and you are prompted for a filename. Type a name to save the file. If you wish, you can just press RETURN and the file will be saved under a default name of "TEXT".
Note that unless you use the default filename, there is not sufficient room to save a file on the master disc, and you should therefore prepare work discs before you try to print.
You are then asked if you want to print the file. If you answer "N" you are given the opportunity of preparing further files, and if you answer "N" to that, the program will terminate.
Printing
Answering "Y" to the 'Print now' prompt will start printing the file, using your chosen font. You should make sure that your ptiner is connected and turned on, and the paper is in the correct position. The text will be printed, without any extra linefeeds or paper feeds. When printed, the program will ask if you want to print further files, and if you answer 'Y', it will ask you for another filename and repeat the whole process.
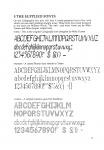
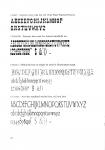
5. The Supplied Fonts
On the Calligraphy disc you will find X ready-prepared fonts files, with which you can stay printing straight away. These fonts have been designed in the main by Wallace Nicoll. The ORIG and WEST fonts are by Mike Turner and Brian Jaques respectively.
F.ORIG
This is the original Calligraphy font designed by Mike Turner
F.ROMAN
A classic Roman face similar to Times
F.STRIPE
A striped typeface, good for headlines
F.WEST
Capitals only, like the old Wild West Wanted Posters
F.THEATRE
Famous face used for theatre handbills etc.
F.PADUA
Mediaeval face as might be used in illuminated script.
F.CLASSIC
Another standard serifed face, tall and thin.
6. Desktop Publishing Tips
Calligraphy can be used as the basis for simple desktop publishing work. Desktop publishing is an exciting new area of computing, in which you can use your micro to replace some or all of the traditional typesetting and page make-up tasks. Calligraphy does not offer a page make-up facility, but there are several ways in which you can combine text, headlines and graphics, using Calligraphy for headlines, and some body copy, ordinary Epson printout for further body copy, and screen dump programs for graphics.
When you have printed some lines of text with Calligraphy, you can exit the program, load an ordinary text file into a wordprocessor, and print it. It will appear underneath the large Calligraphy type, which is how a story would normally appear under a headline. Alternatively you could produce a screen dump. To help you here we have included a screen dump program on the Calligraphy disc.
To use it, you need to load your picture into memory and then call the screen dump. A suitable program for, say, a saved MODE 1 screen would be:
10 MODE 1
20 REM "PICTURE" IS THE NAME OF YOUR SAVED SCREEN
30 *LOAD PICTURE FFFF3000
40 *SDUMP
To get the best results, always use a new or newish ribbon. Many people who produce graphics work regularly keep separate ribbons for dumping only, and remove the ribbon again afterwards. This is not always to be recommended as unsealed but unused ribbons have a tendency to dry out.
If you are using the scissors-and-glue methods described above, remember that you can often improve the appearance of your work by reducing it in size by using a good quality scaling photocopier.
The Calligraphy Font ROM
Also supplied on the Calligraphy disc is an extra program for BBC Micro owners with Sideways RAM. Sorry, but this program won't work on a Master, nor will it work without Sideways RAM. The program is a font system, using the normal 8x8 fonts on the BBC Micro. To use the program, load it into a bank of Sideways RAM (your RAM manual will tell you how to do this - the file, called FONTROM on disc, should be regarded like any other ROM image.)
When you have done this, press CTRL-BREAK. Please note that this ROM image should *not* be blown onto an EPROM as it modifies itself.
The commands available from the ROM are:
| *FONT [name] | Selects a font |
| *FCAT | Lists available fonts |
| *NORMAL | Returns to normal font |
| *DESIGN | Enter font designer |
| *FCLR | Clear all fonts |
| *FDEL [name] | Deletes a font |
These can be seen at any time by typing: *HELP FONTS
*FONT [name]
This select a font for display on screen. The name given must be one of the fonts held in memory, shown by *FCAT.
*FCAT
This lists the fonts held in the sideways RAM. The file is full when you receive it, but the existing fonts may be cleared, and additional fonts designed by you may be added. The new set of fonts may be saved from sideways RAM using the command to save ROM images given in your sideways RAM manual. If you aren't sure how to save ROM images the following program will do it, provided you know in which bank your Font ROM is contained. Any ROM listing program will tell you this.
10 INPUT "Bank number to save :" Y%
20 INPUT "File name for ROM image :" F$
30 X%=OPENOUT F$
40 FOR I%=0 TO &3FFF
50 BPUT #X%,FNbyte(I%+&8000,Y%)
60 NEXT
70 CLOSE #X%
80 PRINT "Done."
90 END
100 DEF FNbyte(!&F6,Y%)=USR &FFB9
*NORMAL
This returns to the default BBC font.
*DESIGN
This enters the built-in font designer, a superlative character generator, which is detailed on the reverse of this sheet.
*FCLR
This will clear all the font definitions stored in the ROM, to make way for your own creations.
*FDEL [name]
This command, followed by the name of a font, will delete an individual font.
The Font Designer
The font designer allows you to edit any of the predefined fonts, or the standard BBC font. The editor is entered by *DESIGN and these are the control keys to use within the editor.
Z X : /
These keys, often used for arcade games, will move the cursor round the 8 x 8 grid.
Cursors
Unlike the above, these move the grid while keeping the cursor un moved. The pattern rotates, so these can be used for moving a character up, down, left or right within the grid.
RETURN
Sets a dot in the pattern.
SHIFT
Clears a dot in the pattern.
< and >
Select which character to edit, by placing it under the on-screen arrow.
S
Store font. Select a blank position on the font list using cursor keys, and type the font name.
L
Load a font. Select a font from the font list using the cursor keys, and press RETURN.
C
Clear the current character grid.
V
Reflect the current character along the vertical axis.
H
Reflect the current character along the horizontal axis.
R
Rotate the character through 90 degrees.
I
Italicise all characters.
B
Embolden all characters.
O
Outline all characters.
G
Get character. The character is selected using < and >, and when you press RETURN, the character under the arrow is copied into the grid.
ESCAPE
Exit to BASIC.
Using The Fonts
Once a font is selected using *FONT, it will appear on screen in response to all PRINT statements and other VDU commands, until deselected by another *FONT command, or *NORMAL. If you use an Epson-compatible dot matrix printer and use CTRL-B or VDU 2 whilst a font is active, it will send font characters to the printer as well, at 60 characters per line on a normal width (80-column) printer. *FONT commands can be included in BASIC programs, and will not affect the running of BASIC. Also, word processors will use the fonts when printing out, and, in the case of VIEW and other non-Mode 7 systems (except InterWord), the fonts can be displayed on screen while you type. If your screen is in Mode 7, the fonts will not be displayed although this does not affect printing.
Loading
Disc: SHIFT-BREAK
Game Credits
Font Design and Printing Software for the BBC B/B+/Master 128
Calligraphy written by Mike Turner and George Yetts with fonts by Wallace Nicoll and Brian Jaques
Manual written by David Lawrence (c) Redwood Publishing 1987-90
Included as part of Calligraphy software.
Screen Designers
The following utilities are also available to allow you to edit the supplied screens of this game:
Cheats
Download
Report A Problem
We thank you from the bottom of our hearts if you report something wrong on our site. It's the only way we can fix any problems!
You are not currently logged in so your report will be anonymous.
Add Note
Release Country
Change the country to update it. Click outside of this pop-up to cancel.


