| Genre: | Unknown Genre Type |
| Publisher: | Acorn User |
| Contents: | Jottings Operating Environment (Acorn User) Monitor Test Program (Acorn User) Proportional Screen Dumps (Acorn User) Sideways Printing (Acorn User) Tree Of Pythagorias (Acorn User) Video Image Enhancer (Acorn User) |
| Cover Art Language: | English |
| Machine Compatibility: | BBC Model B |
| Release: | Professionally released on 5.25" Disc |
| Compatible Emulators: | BeebEm (PC (Windows)) PcBBC (PC (MS-DOS)) Model B Emulator (PC (Windows)) |
| Original Release Date: | 15th January 1988 |
| Original Release Price: | Unknown |
| Market Valuation: | £4.00 (How Is This Calculated?) |
| Item Weight: | 64g |
| Box Type: | 5.25" Disc(s) Celophane |
Variant Items
There are 0 other items featuring this same game (that we know about!). Click any of them for their details.
Active Auctions
Closed Auctions
Buy It
Unfortunately no-one is currently selling this item.
Auction Price Watch
Worried you're being ripped off? Closing prices on eBay can help you decide what a reasonable price is for a particular item.
Full Instructions
Welcome
Welcome to the Acorn User 1987 Compilation Disc. We have brought together for you some of the best programs published in Acorn User magazine during the year. In case you don't have the original magazine articles, we have reproduced the documentation here, suitably edited. The disc is 80-track format, with program on both sides. To select a program, press SHIFT-BREAK with the disc in Drive 0, and a menu will appear.
A program can be selected by moving the cursor keys until its name is highlighted, and then pressing L. Pressing I gives more information about the program. Use this option - a lot of information is given, including all the filenames. If you press 2, the menu for Side 2 appears. (To redisplay the menu for Side 0, press 0).
Side 2 of the disc also contains a bonus item - a number of high quality graphics which are displayed with the 'SHOW' program. To load any of these graphics individually, look at the SHOW listing and see how it's done.
Some programs on the disc are not shown on the menu. These are the ones which cannot be run from BASIC. The programs are documented here, so you can see how to run them. The proportional screen dumps and autumn files are examples of these.
Video Image Enhancer
By Phil Wilkes (Acorn User Sep '87)
This is a set of five programs which can be used to manipulate video images captured from a digitiser, or indeed drawn with an art package, perhaps using an airbrush technique, the object being to improve the appearance.
The first two programs, WILKES1 and WILKES2 are respectively direct screen access and legal versions of a program to correct the distortion factor which occurs in most digitised pictures. The ratio used in the program is 1.2, but any other factor can be used, by inserting a different value in the PROCratio call. The program WILKES5 does the same thing for horizontal distortion.
The program WILKES3 is used to generate a machine code program O.EFFECT, which is used to provide two effects, smoothing and edge detection. The former smoothes the sharp edges of a digitised image, and the latter provides an outline, by converting all pixels to white except where a colour changes, which is shown as black. The program WILKES4 gives a demo of this. PROCeffect in WILKES4 takes three parameters which it passes unchanged to the O.EFFECT routine. These are:
M%
The current mode (0, 1 or 2)
E%
The effect required (1 for edge detection, 2 for smoothing)
T%
For edge detection, the lowest colour difference to trigger detection. T%=1 triggers all edges. This is designed for use with digitised pictures, where grey scales are represented as normal colours according to number. For smoothing, T%=0 rounds average down, T%=1 rounds them up.
For example, PROCeffect(1,1,2) gives edge detection for a Mode 1 picture, with a threshold value of 2. If adjacent colours were 0 and 2, 1 and 3 a line would be drawn. If they are only one colour apart there would be no line.
Mandelbrot Plot
By David Johnson-Davies (Acorn User May '87)
Mandelbrot plots, named after the originator Benoit Mandelbrot, are an interesting form of fractal plot, which really come alive on a graphics plotting system such as the screen of the BBC Micro.
In the program provided (MANDEL), a plot of the equation below is made. The curve is coloured according to how many iterations are needed to get from the start estimate to within a certain accuracy of the complex root of the equation.
Try the program with different values of x, y and s. The value of x and y should be between -1 and 1. Don't give a value less than about +/- 0.2. The value of a should be fairly small, not more than about +/- 0.01. Note that the plots can take several hours to run. Happy plotting!
Kiddie Art
By John C. King (Acorn User Jan '87)
The Kiddie Art program presented here gives young children a graphics system which creates the pictures by moving areas of colour around the screen. Just two shapes are used, a square and a triangle, and only one can be activated at a time. When happy with the colour, size and position of the shape it is fixed to the background. The screen can be quickly and easily filled with colourful patterns and pictures to give children a sense of achievement and fun.
The program either from the menu or by typing CHAIN"IMAGES". A title page then appear on screen; press any key to start. A blank screen is presented; press either function key f0 for a square or f1 for a triangle. Pressing either of these keys at any time gives you a new currently active shape, fixing the previous shape to the background. The active shape may be moved round the screen using either the function keys f2 to f5 or the cursor keys. Colour can be changed using f6, size can be altered with f7 making the shape larger or with f8 to make it smaller.
Mistakes in creating a picture can be corrected by covering them with a currently active shape, and changing the colour of the shape to that of the background. The whole screen can be cleared by pressing f0 for a square and holding the f7 key down until the square covers the entire area. You can then change the colour of the square as desired. This is also a useful technique for creating a background. If you want to create a beach scene, press f0 for a square, enlarge it to fill the whole screen and change its colour to cyan.
Use f0 once more for a second square, enlarge it to fill the screen again, change its colour to blue and then move it down so about one third of the screen is cyan. Repeat this a third time with a yellow square moved down to the bottom third of the screen.
The picture can be saved at any time by pressing 'S'. When your picture is saved, the currently active shape will be fixed to the background. To load a saved picture, press 'L', select tape or disc and enter the filename. The whole screen can be quickly deleted. Choose a square and without moving it at all, hold your finger on f7 until the square fills the screen. Note that all previous shapes still occupy memory, so starting again is usually better.
The disc contains a sample art file BREAK, and GALLERY, a program to display a series of art files (add each file name to the data list at the end).
Synthesiser
By Martin Phillips (Acorn User Dec '87)
This is a program to turn your BBC Micro into an electronic music machine! The program is loaded from the menu (or CHAIN"SYNTH") and can immediately be used by pressing keys on the second and third rows of the keyboard. Only two octaves are covered by the keyboard, but this range is extended by f0, f1 and f2 which select low, middle and high octaves respectively. f3-f6 select different instrument sounds.
Disc Indexer
By John Weller (Acorn User Jan '87)
Have you ever had problems remembering just which disc you stored an important utility program on, or which of your many wordprocessor discs has that letter you wrote to the Gas Board last year? If you have, then you need an index of your discs and that is exactly what this program will do. All it requires, apart from a BBC B micro and a disc drive, is that your discs have been suitably titled using the *TITLE command and that the label on each disc carries the same title.
The program prompts for the drive you will be using (0 or 1) to read the discs. It then asks if you have a data file to load; to start, reply N. After giving an index name, you will be instructed to insert a disc, so insert a disc to be indexed into the drive selected and press f0.
The title of each side of the disc will be displayed and you will be asked to put in another disc. After all of the discs have been indexed, press f7 when 'Put in a disc' appears. If you want an index in alphabetical order, answer Y to the next question. Your index will be sorted in ASCII order of filenames, ignoring the directory character. A menu of output options will be offered.
Four output options are offered. Output 1 is output to screen, option 2 is hard copy to a printer. For a spooled file, choose option 4 and option 4 is for a data file. Option 1 clears the screen with VDU12, sets page mode with VDU14 then prints the index to the screen with PROCscreen. Option 2 uses PROCprint to turn the printer on and page mode off than calls PROCscreen so that the index is sent to the printer as well as the screen.
The main use of option 1 will be to check the index prior to using option 2 to create a hard copy as a permanent record. If you classify your discs into groups, e.g. games, music, letters and so on, you may wish to have an index of the group spooled on to one of the discs of the group using option 3. The index can then be called up by a !BOOT file using VDU14 and *TYPE INDEX. The data file option, option 4, is mainly used to enable an index to be expanded to include more discs. If an index has been saved as a data file it can be re-loaded by replying 'Y' to the initial question, do you have a data file to load? You will be asked for the filename, the file will be loaded into the arrays and you will be able to continue by inserting the new discs, saving the new index as a data file when the extra discs have been added.
The program will work on any disc formatted to the 'legal' Acorn standard, a catalogue of up to 31 files held in sectors 0 and 1 of track 0. The program is compatible with the *SWAP format used by Disc Doctor, Enigma ana ADT, and the Watford DFS 'large' catalogue format. The program can index up to 40 disc surfaces or 600 filenames, whichever comes first. These values can be changed by altering variables maxdiscs% and maxentries% in the program, but it is advisable if doing this that you lower the value of PAGE. Enough space must be left for at least one file, meaning that PAGE should not be lowered below &1200 on a standard Model B. The program is written to work on a dual double-sided system.
Tapestry
By Anneke Sicherer-Roetman (Acorn User Feb '87)
Tapestry is intended for use with a lightpen, but can also be used with a joystick or the cursor keys. It allows the design of embroidery patterns by painting colours on the screen and it converts the resulting designs instantly to cross stitch embroidery patterns. In this program the data in memory can be represented on the screen either as little coloured squares or as embroidery symbols.
There are thirty colours and four palettes to choose from. Designs can be saved, loaded and dumped to a printer. A design takes up only 1K of memory. A display of colours used with the number of cross stitches per colour can also be displayed and printed out.
Although the program works with the cursor keys, it really comes into its own with an analogue joystick or, better still, a lightpen. The program was tested with the RH Electronics lightpen, and should also work with the Watford lightpen. If you will be using another make of lightpen, you may need to make the program changes detailed later.
When you run the program (type CHAIN"STITCH" or use the menu) you are first asked to enter your choice of input device. You are then presented with a blank grid and a menu on the right. If you are not using a lightpen, a small cursor is visible somewhere on the screen. Lightpen users should adjust the brightness of the monitor so that a steady signal is generated by holding the pen a few centimetres away from a while area on the screen. Now choose any option by pointing at it, then press the lightpen switch, the fire button or the space bar respectively. If you are using the cursor keys, the cursor can be speeded up by simultaneously pressing Shift.
You can choose to load in a previous design (type in the filename) or start a fresh design. In the latter case, you must 'wipe' any previous desing from the pattern memory and the screen.
No designing can be done on this menu screen. To make or alter a design, point at 'design', which draws the design screen in full colour with a menu on the right containing 30 colours plus the letters M and P. Choose a colour by pointing at it on the menu and then paint the colour in the desired spot on the grid, again by pointing at it. The chosen colour is indicated by an asterisk in the menu. By pointing at P you can switch between four palettes, and the used palette is saved with the design. This screen is only for designing purposes. For filing and printing, return to the menu screen by pointing at M. The design is then redrawn in embroidery pattern symbols. When you are satisfied with the design you have come up with, save it to disc or tape (type in the filename) and/or print it on paper.
'Legend' on the menu screen displays a list of used colours or symbols, along with the number of cross stiches per colour. You can dump this to the printer by pointing at the desired option.
NB: Lightpen users will find that it is virtually impossible to paint a spot that is already red or black. Lightpens are rather insensitive towards the red end of the spectrum and, of course, black has no light at all and so there is nothing for the pen to 'see'. If you experience this difficulty, save the design, re-run the program, choose the joystick or cursor keys option and finish the design to your satisfaction. This will only be necessary if you make a painting mistake when using the colours red or black. As supplied, the program works with an analogue left-hand joystick. For a right-hand joystick, change line 1960 to x%=39-ADVAL3DIV1638 and line 1970 to: y%=31-ADVAL4DIV2048. Note that switched type joysticks will not work except with the Compact analogue emulator.
The program works for the RH Electronics and Watford lightpens. To adapt it for the Robin Professional lightpen and the Datapen, change line 1920 to:UNTIL ADVAL0AND3=1. For the Stack lightpen alter line 1920 to: UNTILADVAL0AND3=0. Thr Robin standard, Minor Miracles, Beebug and Micro User lightpens have no switch. You can make the space bar act like a switch by changing line 1920 to: UNTIL INKEY(-99)
If you wish to substitute your own screen dump command, then alter line 490 of the program to the required command.
Menu Commands Summary
Quit:
leaves program and returns back to the Basic prompt
Design:
switches to the colour embroidery design screen
Load:
requests a previously saved screen filename which is then loaded back into Cross Stitch for editing
Save:
requests a filename under which the current design will be saved
Print:
dumps the current screen content to printer
Legend:
provides a key to the meaning of symbols in the current design; this may then be printed out if you desire
Wipe:
clears the current design from memory
OSCALL:
allows you to enter a star command
Tree Of Pythagoras
By Albert Koelmans (Acorn User Feb '87)
Pythagoras is best known for his theorem "in any right-angled triangle, the sum of the areas of the squares on the two short sides is equal to the area of the square on the long side, the hypotenuse." During World War II, a Dutch engineer, Bosman, was forced by considered the Pythagoras theorem, and wondered what would happen if he drew a new triangle on top of each of the two squares, and then new squares on top of these triangles and so on?
The program here offers three different sets of variables to build up different shaped trees based on Bosman's Tree of Pythagorus. If you are interested in the algorithms used to generate the tree, examine the listing and refer to the original Acorn User article.
Theme
By David Lawrence (Acorn User Apr '87)
Theme is a music editor, which allows you to create tunes using the three sound voices. It also caters for 'envelope' changes, key signatures, instant playback of all three voices and long-term storage of your masterpieces. The program is loaded from the menu or with CHAIN"MUSIC1"
When it has loaded, you will be asked to enter the key signature - the number of sharps and flats at the beginning of the music. If there are none, just press RETURN. Otherwise, enter the number of sharps or flats (one to five) followed by S for sharps or F for flats, e.g. enter 2S for two sharps (D major). The screen will clear and you will be presented with the main editor screen (see figure 1), consisting of the three staves on which music can be entered, a status line at the top and a message window in the bottom right-hand corner.
The staves have both treble and bass clefs with sharps or flats, if relevant. Each stave represents a voice and, to start with, each contains one note. The edit cursor is positioned in the top left-hand corner (this is note one of voice one). The cursor represents the range of pitches available in the editor (four octaves, from two octaves below middle C to two above). Although key signaturesw are catered for, neither time signatures not bar lines are, and hence all sharps and flats must be included every time they occur.
Changing pitch and movement around the staves is controlled by the cursor keys, along with SHIFT and CTRL. See the table for a full list of control keys. Notes are selected with the function keys. The note lengths available vary from a demisemiquaver to a semibreve. Dotted notes are obtained by selecting the appropriate 'un-dotted' note and pressing the full stop. Pressing full stop again will remove the dot. Accidentals can be added using S for a sharp, F for a flat, N for a natural and O to remove any accidental. Rests are obtained by pressing SHIFT along with the appropriate function key, i.e. for a crotchet rest press SHIFT-f3.
When you are happy with the length and pitch of a note, press RETURN. This will 'sound' the note, move the cursor right and will give you the next note to edit. This note will be exactly the same length and pitch as the last one. This note can be edited in the same way. Gaps can be left at any point on a stave (i.e. there can be fewer than eight notes on a page). This enables you to line up notes correctly.
To delete a note, move the cursor over it, and press Delete. You can't delete the first note in any voice. Notes can be inserted by moving the cursor onto the note before which you want to insert, and pressing I.
To play the music, press Tab. Press Space to stop. The tempo (speed) can be varied by pressing a number between 1 and 9 (not while the music is playing).
Theme allows you to change the envelope that a voice uses as it plays. All voices are initially assigned envelope number one. To change an envelope move the cursor to the point at which you wish the change to occur (not that an envelope change takes up space so insert a space if necessary) and press f6. The letter A will appear between the bass and treble clefs. This corresponds to envelope one (B is two, C equals three, and so on). To change to a different envelope, use the up and down cursor keys. The envelope marker can be deleted with Delete or changed to a normal note or rest with the appropriate function key.
Pressing P will perform a screen dump. (Replace the routine in DEFPROCdump if you wish to use your own dump.) Finally, the number of notes i each voice (excluding gaps) and the current page are displayed at the top of the screen. There are just over 60 pages, each with eight notes, giving you about 500 notes in each voice.
To save your music or load a previously saved tune, press @. On a Master Compact, shift SHIFT-0. You will be presented with a short menu of five options.
Option 1 will ask you for a filename and save the music in a form that can be loaded back in, using option 2. This means that the key signature, the accidentals and any gaps you left are preserved, so when reloaded the music will look the same. Note that saved files are all the same length regardless of how many notes you entered.
Option 2 will ask you for a filename and load that file. Once loaded, you will be returned to the editor at the beginning of voice one. Option 3 saves in AUTUMN format. Files saved in this form cannot be loaded back into the editor!
Control Keys For Theme
Arrow Left/Right - Move cursor left/right, Arrow Up/Down - Increase/Decrease pitch/envelope number
SHIFT-Arrow Left/Right - Move left/right one screen
SHIFT-Arrow Up/Down - Move cursor up/down screen (to different voice)
CTRL-Arrow Left/Right - Move to beginning/end of music
f0: demisemiquaver (With Shift, gives corresponding rest)
f1: semiquaver
f2: quave
f3: crotchet
f4: minim
f5: semibreve
f6: envelope marker
S: accidental sharp
F: accidental flat
N: accidental natural
O: cancel accidental
.: switch on/off dotted note
RETURN: sound note and move on
1-9: select tempo
Tab: play music
Space: stop playing
Delete: delete current note
I: insert before current note
@: filing menu
P: dump screen to printer
Autumn
By David Acton (Acorn User Apr' 87)
Acorn User has introduced a standard called Autumn, the 'Acorn User Tune and Music Notation', a simple method of storing notes on tape, disc or network. The Autumn format is described below, and the disc contains the following files (on Side 0, not on the menu)
PLAY
A machine code program which will play an Autumn file
EVENT
A program which plays Autumn files while another program is running
SAMPLE
A short Autumn file (opening bars from Bach's French Suite No. 4)
AUTUMN1
A longer Autumn file (the full piece)
You can create your own Autumn files by calculation, using the format given below, and examination of the sample files provided, or alternatively, use the THEME music editor provided on this disc which has an option to save tunes entered in Autumn format.
The PLAY format works with the syntax: *PLAY [name] [address] [tempo]. If you are using cassette, type */ PLAY instead of *PLAY. The name should be the filename of an Autumn file. The address is a memory location in hexadecimal, rather like those used with *LOAD and *SAVE. This address is where the tune data will be loaded, so you can ensure that any tune you play will not interfere with a program you have in memory. The tempo is like that requested in listing 1; one being the fastest value. So, to play the sample file using memory from &2000 upwards for example, type: *PLAY SAMPLE 2000 1 [Return]
Background music, that is, music playing while another program is running is performed with the 'EVENT command, which has the same syntax as play, but control will return immediately to your program. Again, cassette users should type */EVENT. Note that *EVENT uses locations &900-&9FF in memory, so your main program should not use these areas.
The Autumn File Specification
| Byte | Function |
| 0-1 | Pointer for voice 1 start (lo-hi) |
| 2-3 | Pointer for voice 2 start (lo-hi) |
| 4-5 | Pointer for voice 3 start (lo-hi) |
| 6 | Pitch, note 1, voice 1 |
| 7 | Duration, note 1, voice 1 |
| 8 | Pitch, note 2, voice 1 |
| 9 | Duration, note 2, voice 1 |
| ... | |
| i | 255, termination pitch for voice 1 |
| i+1 | Pitch, note 1, voice 2 |
| i+2 | Duration, note 1, voice 2 |
| j | 255, termination pitch for voice 2 |
| k | 255, termination pitch for voice 3 |
Meaning Of Pitch Codes
| Pitch = 1-239 | Standard pitch, next byte is duration |
| Pitch = 0 | Rest |
| Pitch = 254 | Envelope: next 13 bytes are parameters |
| Pitch = 240-253 | Reserved for future enhancements |
To implement an envelope change, insert 254 as a pitch code, and follow it with the envelope parameters. The next byte contains the next pitch code, i.e. no duration code is required. After Pitch 0, use the normal duration code for the length of the rest. Duration codes are expressed in 1/100ths of a second.
Sideways Printing
By John Knight (Acorn User Apr '87)
This program will allow you to print ViewSheet spreadsheets and any other ASCII files sideways on an Epsoncompatible dot matrix printer. The maximum total file size is 20480 bytes, which should be big enough for most documents. The maximum depth is 96 lines. If the file has more lines than this, the balance are printed on the next page. The program when run (from the menu or CHAIN "SWPRINT") requests the name of your ASCII file, and then proceeds to print.
Getting the output into a file can be done in several ways, the obvious one is 'SPOOL. The View family permits this but other wordprocessing programs such as Wordwise have a menu option to produce spooled output. All non-printable characters, that is, all values below space in the ASCII sequence, are treated as carriage-return and consecutive non-printable characters are treated as one carriage-return. Here are the steps you should follow to print sideways using ViewSheet:
1. *SHEET
2. LOAD or enter the data manually
3. Set print window to cover whole sheet
4. *SPOOL filename
5. SCREEN
6. *SPOOL
7. *BASIC
8. CHAIN"SIDEWAY"
9. Enter filename
If you have a printer that can handle paper wider than eight inches then you can alter 'maxdots' in PROCsetlimits to be 120 times the width of your paper in inches, giving you more lines across the page; the value of 'maxwidth'. So any mention of 96 lines really means maxwidth.
When the file is complete the program asks if there are any more to be printed and if there are returns to the point where you tell it what the filename is.
Proportional Screen Dumps
(Acorn User May 87)
Many screen dump programs are available for the BBC Micro, but if they use the standard single and double density dot graphics, the ratio of width to depth of a printer pixel does not match that of a screen pixel. The Epson pixel is slightly wider and the result is that the picture is flattened. Circles do not come out round, they bulge in the middle. There are two programs on the disc which overcome this by using an extra graphics mode on some Epson compatibles such as the Citizen 120-D (but not many, which is why it is rarely used), which prints with a different aspect ratio, and as a result, produces a rounder circle.
The first DUMPM0 is for Mode 0 screens, and the second DUMPM15 is for Modes 1-5. The dumps should be *RUN at the appropriate part in your program, ie, you should insert the line *DUMPM0 or *DUMPM15. You might like to try the programs out by altering the Tapestry program elsewhere in this collection. To check if your printer supports this program, look for an ESC 5 mode in the manual, usually referred to as CRT graphics.
Oneliners
By Duncan Rowland and others (Acorn User August '87)
In the March issue of Acorn User, we ran a competition to write a single-line Basic program to produce an attractive graphics display. Many of you had a go, and the winners were listed in the June issue. Here are some of the programs, including the winner from Duncan Rowland, and offerings from Acorn User staff Rob Miller and Graham Bell. If you list the program, you'll see that each program does indeed only occupy one line of BASIC!
View Printer Driver
(Acorn User Oct '87)
This program allows you to define your own printer driver for the VIEW wordprocessor, and it allows more type styles and simpler operation than the Acorn version. The generator program allows all the codes to be displayed at once, together with an 11-character comment. When the driver is saved, two files are saved. Apart from the driver, a 'p' file is saved which contains details not only of the driver but also the comments. The codes are entered and displayed in 27,69-type notation rather than the ESC "E" type.
An editing screen which displays both the printer control codes and comments. From this screen it is possible to add, or alter any code. Up to 14 effects may be defined., and the ASCII £ value can be changed. The left-hand side of the screen shows a series of letters associated with each of the codes. By using the letters carefully you can use mnemonic codes for many of the functions.
To enter codes into the driver, first press 'E' to edit. You will then be asked which letter you wish to define. The first code we wish to enter will be the underline code. It makes sense to assign this to be 'U' code. Therefore, press either 'E' or 'U'. The generator will then ask for the start code, so type in: 27,45,1 or its equivalent on your printer. Then it will ask for the stop code, so enter: 27,45,0 and finally the comment, so enter: underline
This will then be displayed on the editing screen. When the driver has been completed, save it to disc by pressing 'S'. It can always be loaded in again and changes made to it. To use the driver, load it in from the View command screen and type: PRINTER [filename] where [filename] is the name you called the driver when you saved it. Then enter the editing screen of View, and at the top of your text add: HT 2 141 Press Shift-f8 before the HT and Return after HT, as HT is an edit command. Then the printer codes can be used in your text by first pressing Shift-f5 (highlight 2) followed by the letter assigned to that code. So to start underlining, include: *Utext text textU when is highlight 2. Put in one highlight for on, and one for off.
An important function that should be included in your driver is the reset code. Figure 1 assigns the symbol'@' to this code. The stop character for this code will be '?'. It is important even with this code to include a stop byte for the driver to function correctly. When using a reset at the start of text always include it twice: *®*®
PCB By CAD
By Joe Telford (Acorn User Dec '87)
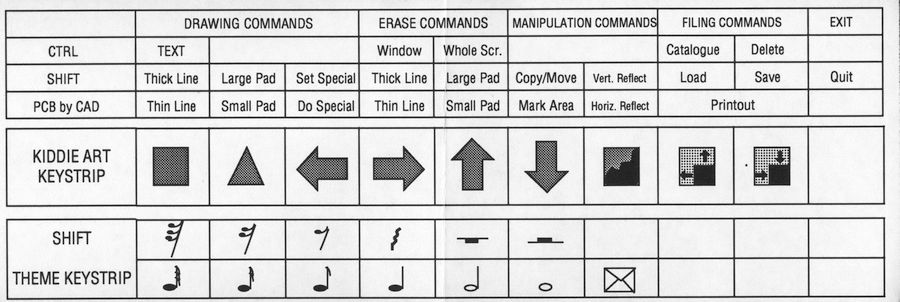
This program allows you to design simple printed circuit boards on your BBC Micro. A function key strip is provided to show the commands used by the program.
Start the program from the menu or CHAIN "PCBCAD". The words 'Horizontal' and 'Vertical' appear in the bottom left-hand corner, and the figures showing indicate the distance of the cursor cross from the bottom-left corner of the graphics screen. Move the cross around the screen by using the cursor keys. The cursor keys alone move the cursor in 0.1-inch steps, which match the pin-outs of a wide range of electronic components. For faster movement, the Shift key moves the cursor in one-inch increments, and the Shift-CTRL keys together move it in 0.5-inch steps. For extra precision, the CTRL key enables the cursor to move in 0.05-inch gaps.
The main drawing commands to draw tracks are allocated the first three function keys. The easiest to use are f1 and Shift-f1. f1 immediately draws a small pad (about IC size), at the cursor point. Shift-f1 draws a larger pad, which is useful for soldering in bigger components or sockets. Tracks are drawn by pressing either fo for thin lines or Shift-f0 for thick lines. Just above the horizontal/vertical indicator, is a blank line which the system uses to guide people through the more complex commands. In the case of track drawing, the following sequence is followed:
Press f0 or Shift-f0
Message says 'Move to line start and press S' - Do this
Prompt then says 'Move to line end and press E' - Do this; the cursor leaves a 'ghost' line as you move
Pressing E draws the line as thin or thick as selected
Drawing-in text is a similar multi-stage process. On pressing CTRL-FO, the message 'Type text then press Return appears. This generates a 'ghost' rectangle on screen, which can be moved around. The message 'press SPACE to fix' indicates how the text can be finalised on screen.
Shift-f2 generates a message 'Type code:', and this means type a mnemonic from the following list:
8PINV
16PINV
8PINH
16PINH
14PINV
28PINV
14PINH
28PINH
JOINS
JOINL
You'll quickly appreciate using f2 repeatedly with JOINS and then drawing tracks by repeatedly pressing f2. This also automatically generates the 'E' to end a line then starts a new line.
Erasing parts of the screen is the only way of editing it. The simplest commands are f4 and Shift-f4, which delete small and large pads respectively. CTRL-f4 gives a warning, then clears the whole screen, effectively giving you a new PCB to use. Both f3 and Shift-f3 behave exactly like f0 and Shift-f0, erasing instead of drawing, though I generally tend to use only Shift-f0, which wipes out thin or thick lines. CTRL-f3 erases a rectangular area of screen, and gives simple instructions for the user to follow in setting up the rectangle.
Screen manipulation is performed by function keys f5 and f6. Function key f5 gives instructions on how to mark a rectangular area, and Shift-f5 lets you move or copy this area to another part of the screen, again accompanied by instructions in the lower area of the screen. Function key f6 marks an area, allows its movement or copying to another part of the screen, and then reflects the rectangle horizontally. For example, text should be inverted to look like mirror writing. This is useful because it means that text on the track side of a PCB can be read once the tracks themselves are inverted during the exposure process. Shift-f6 performs the same task as f6, except that the reflection is in the vertical axis rather than the horizontal.
Both f7 and f8 cause the current screen to be dumped to an Epson-compatible printer. CTRL-F7 displays a catalogue of the current disc. (The design is restored afterwards). CTRL-f8 allows files to be deleted. Shift-f7 and Shift-f8 load and save the PCB design to disc.
Remember that the program will not redraw what you delete or cover-up. This means that you should inspect the design for partly deleted pads, or pads without drilling points.
A couple of limitations should be noted. The program cannot lay tracks between IC pads, nor can it handle multilayering.
Monitor Test Program
By Chris Drage (Acorn User Dec '87)
This is a short program which you might like to run on a monitor you are considering purchasing, as it stretches the quality of the monitor to its limits.
A. Write random lower case characters in mode 0. Each character should be distinct.
B. Alternating inverse M/W. Monitors find these difficult. Particularly check the screen edges.
C. The screen flashes between black and white, testing if the monitor's power supply can cope with rapid changes. The build-up of the white screen should happen instantly.
D. The spaces between each white bar should be uniformly black, as should the right-hand screen. Uneven shades of black indicates a low frequency monitor.
E. The border drawn round the screen should be straight and fit on the screen evenly on all sides.
F. The solid circle drawn in mode 0 should be central and show no signs of being oval.
G. This is severe test to resolve colours. Each band should be distinguishable.
H. Persistence test. No image should remain after the text is removed.
I. This tests the clarity and richness of the colours.
J. The dot pattern is a severe test of the monitor's resolution. Check for interference patterns.
K. A good monitor gives vertical stripes without reducing them to interference patterns.
L. Not really included as a test but as a guide for adjusting your monitor.
When making comparisons it is important to compare like with like. To compare the scores of a hi-res colour monitor with monochrome is unrealistic.
By John Chisholm and Graham Bell (Acorn User Oct '87)
This program simulates *PRINT on the Master 128, or "TYPE on the BBC Model B. It is mainly provided for tape or network users who do not have the facility on their system. The program can be used to replay spooled graphics, or just output text. The program is supplied in source form—the filename is PRINTER. When assembled, the file generated is invoked by *PRINT [filename].
Jottings Operating Environment
By Joe Telford (Acorn User June 87)
This is a program to provide an interface similar to GEM on the PC. We call it the Jottings Operating Environment. The program uses Mode 0, and needs either a Master 128 or a BBC Micro with shadow screen. The program only works with ADFS and Econet. The files are compressed into one large file, JOE, which should be copied to an ADFS disc or network file server, and then CHAINed. The relevant files will then be created.
Note that JOE will not perform the following GEM-like operations:
a) Manipulation of whole discs,
b) Manipulation of whole folders ie delete/copy,
c) Working with sideways ROMs with an active second processor.
a) and b) can be dealt with by external applications. c) is a limitation of the operating system itself.
Readers will no doubt be aware that the term WIMPs means 'windows, icons, menus and pointers'. The idea is that windows are opened to give information, and are closed after use. Icons are the symbols inside the windows which we can visually translate to an action. JOE floppy discs, and paged ROMs. Notice also the 'butterfly icon' in the top left of each window. This closes the window and moves one level back toward the zero level desktop. In the opposite corner is the 'explode' icon (*), which alternately expands the window to full size and back to half size.
Below this are the 'scroll-up'and'scroll-down' triangles, which scroll ADFS windows up and down to access icons. Between the two scroll icons is the scroll bar. The black area indicates how much of the available space is showing. Clicking on a floppy disc icon displays a catalogue. The icons in such a window are either folders, symbolic of directories, or files, which can be of almost any type. The file type is specified inside the file icon, and version one JOE supports types: BAS (BASIC programs), CODE (Machine code programs),ROM (ROM images), DATA (anything else).
Either an AMX mouse (with ROM) or keyboard (see table) can be used to control JOE. The JOE pointer is moved round and when over an item, the action button or RETURN activates a process.
If the system is set up correctly, on typing •JOE you will be met with the desktop. Make sure you have a disc in all the drives mentioned, or JOE might hang up when you access an empty drive, then try the following simple tasks to get used to the system. Double-click on the most-used disc icon and you should see the contents of its root ($) directory. The top of your window will keep track of the path-name to the current directory. Double-click on another disc in the lower window. If you've only one disc then double-click on that in the bottom window. Now find a directory in each window. Double-click on that so you have two different directories open.
Click on the explode icon in the top window. That window expands to fill the screen. Click again and the window should return to half size. Try expanding and contracting the lower window.
Click anywhere on the word 'Clock' and the date and time will be continually displayed, stopping only when you click again or activate another icon. The calendar and calculator work in a similar way. Click on 'JOE' and a window will pop up explaining JOE.
The 'Actions' window is activated by clicking on the word 'Actions'. The arrow pointer becomes a highlight bar which moves up and down as the cursor keys are pressed. To leave this window the highlight bar must be clicked on 'Close this Window'. Try clicking on 'Foreground' and 'Background'. Watch and listen to the effect of clicking on 'Sound'. 'BYE allows you to lock-up your hard disc or exit from the network and 'Exit Joe' returns you to Basic, in the last folder visited. So to use this exit command to leave JOE from directory :0.$.BASIC.GAMES, first open windows until the top line of the window reads :0.$.BASIC.GAMES then move into the window and click. Now move to Actions and click again. Click the highlight bar on Exit JOE and you will leave JOE but be left in the selected directory.
The new folder tool: Every directory has a new folder tool. It allows us to create folders. Double-click on the icon and follow the instructions on the resulting pop-up window.
Deleting: It is only possible to delete from within a disc window. You cannot delete from the desktop or within the ROM window. It is however possible to unplug ROMs by first clicking on them then pressing Delete. In a similar way it is possible to click onto a program or folder and press Delete. This will delete a program or an empty folder, but not a folder which contains material.
Copying: It is not possible to copy folders. To explore the copy facilities, open two different folders with files in each and click on one file. Drag to the other window and click anywhere. Follow the instructions in the popup windows.
Transferring ROM images: Open a folder containing ROM images, and open the paged ROMs icon. Click on a ROM image in the 'Open folder' and drag to a sideways RAM slot then click. This may be empty, but it doesn't matter! Follow the instructions and the ROM image will transfer. Many people will want to transfer images from ROM to disc. This can be achieved by clicking on a ROM slot and dragging to an open folder in the other window then clicking. Any ROM in memory will go across in this way, though readers will note that some firms protect their ROMs to stop them being used as images.
Accessing applications packages: The JOE can tell whether a file which has been clicked on is a standard data file or a Basic program, a ROM image or possible machine code, and consequently can access the software in the most appropriate manner. This is all very fine for Basic programs which are simply CHAINed, and machine code routines which are *RUN, but data files tend to be ignored because they could be produced from almost any source.
Once your processing has been done, the simplest way to reactivate JOE is by typing *JOE which calls another utility from the library and reinvokes JOE. If it fails to work then Shift-Break or CTRL-Break followed by Shift-Break will do the trick.
Setting up JOE: Format a new ADFS disc. Create a JOE folder and library folder (*CDIR JOE, then *CDIR LIBRARY). Place the JOE file supplied in the JOE folder, and type CHAIN "JOE". When finished, create a !BOOT file containing the lines
0001 *LIB :0.$.LIBRARY
0002 *JOE
then press Escape and type *OPT4,3. Enter the JOE directory (*DIR JOE) and type *ACCESS WRL. Programs which need to go into the JOE directory are: JOEVDU, JOETOP, CALC, STARMAKER, ICONS, FILEMAKER, CALENDAR
Move back to the JOE source directory and load STARMAKER. Return to the library directory and then list the program. Line 80 may need changing to match your source directory for JOE. Do this by editing as normal and alter that portion beginning *DIR... up to the |M. This is the string which will call JOE into being. Once done, run the amended STARMAKER program and *JOE will be saved into the library directory on the disc. Next CHAIN "FILEMAKER" and answer the questions. A defaults file will then be created. You can run this program again at any time to change the defaults. Now JOE is ready to go. Press CTRL-Break then Shift-Break or type *JOE.
Controls
Arrow Keys - Move pointer
SHIFT-Arrow Keys - Move pointer 4 x faster
CTRL during ptr. mvmt. - Calls UserDump to dump current screen
RETURN - Activate desk icon followed by:
RETURN - Enter Application/Insert ROM
COPY - Enter Copy/Move mode - Copy made on next Return
DELETE - Try to delete selected icon
ESCAPE - Return to desktop level
|
Screen Designers
The following utilities are also available to allow you to edit the supplied screens of this game:
Cheats
Download
Report A Problem
We thank you from the bottom of our hearts if you report something wrong on our site. It's the only way we can fix any problems!
You are not currently logged in so your report will be anonymous.
Add Note
Release Country
Change the country to update it. Click outside of this pop-up to cancel.
Scan Of Selected Article
If you auction an item, it will no longer show in the regular shop section of the site.


