Commodore Format
 1st September 1991
Categories: Review: Software
Publisher: Incentive
Machine: Commodore 64/128
Published in Commodore Format #12
3D Construction Kit (Domark)
Domark finally release the secrets of Incentive's Freescape design system and our reviewer is sent to investigate this thing called Virtual Reality. He finds nothing less than the power of creation... and the CF office - in his C64!
Hands up everybody who knows what the words 'virtual reality' mean. In case your paws are still both firmly fixed to these pages, virtual reality is a term used to describe computer generated environments. It's been overused by people who want to impress you ever since it was first coined. Now there's 3D Construction Kit, and it uses words like 'artificial' and 'reality' all over the place. It's not a game but, so the box claims, a program which allows you to build virtual realities - and then play games with those VRs independently of 3D Construction Kit itself.
If I start to describe the things you can do and how you go about doing them, we'll run out of space before I get very far at all. But the basics are simple. So simple in fact, that I made a VR Commodore Format office just by sitting down with the program loaded up in front of me and experimenting for a couple of hours. And, incredibly, I only had to look at the manual now and then. Stick around and I'll tell you what exploring VR is like.
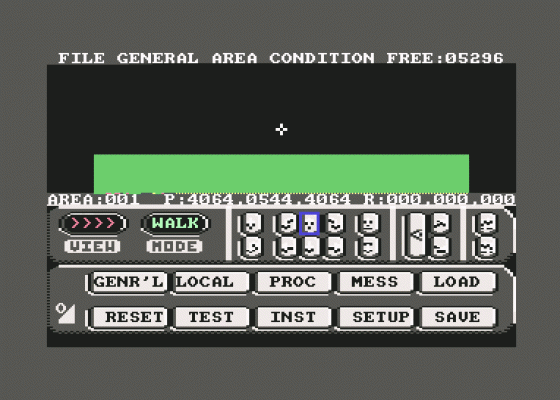
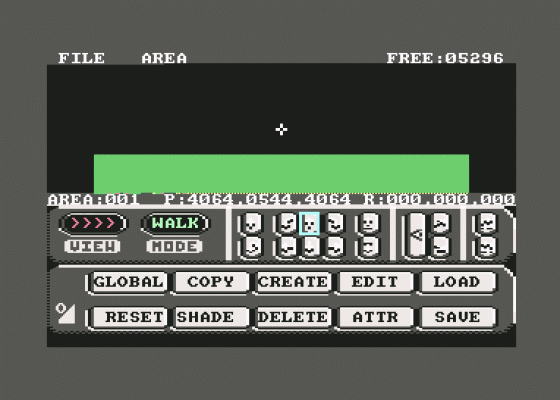
Actually, the Kit consists of three programs, and the first one of these I loaded up was the Environment Editor. The first thing you see, once the program is run, is a screen split into two halves: at the top, your window onto the environment; at the bottom, a control panel.
In the beginning there was nothing. The 'area' covered by my environment was no more than a green floor with me in the dead centre. You can create well over 200 areas and link them together but the one you start with is big enough to explore. So I faced one edge and moved the cursor over the Create button on the control panel. Another row of buttons offered me a choice of things to create. I chose a rectangle and it appeared in front of me, standing on its edge. I selected the Edit button and the edit menu replaced everything else on the screen. I selected the rectangle to edit and the normal screen display returned. This time, the control panel was adorned with labelled arrows which enabled me to edit that rectangle any way I wanted. I began by pushing it way from me, watching it shrink as it went right up to the edge and stopped.
Then I stretched it left, right and then up - as far as I could - in every direction. I'd built my first wall. I turned 90 degrees and did the same again with another rectangle. Using the Shade button, I made this one a different colour so that if I had to re-edit anything later, I could remember rectangles by their colours. When I got to the third wall (again turning 90 degrees) I made a long low rectangle. Then I used the Copy key to duplicate this, shaded it a different colour and hung it above the lower one to create a wall with a banded effect.
But I wanted to make a model of the CF office so that you could have a look around it. Our broom cupboard-like abode, which houses everyone on the team, is L-shaped. So I moved out of the centre until I stood with one wall behind me, and my two other walls leading off into the distance. Then, because 3DCK displays co-ordinates at all times, I could make another rectangle and move it to where one of our office's intruding walls would be, ahead and to the right of me. After another short stroll around this, I built the other part of the L-shape and finally added the remaining far wall.
This was a good point at which to start taking advantage of some of the memory-saving tips in the manual. You see, there's no need to shade things you can't see. In fact, the program slows down if you do. All those rectangles I'd made had two faces. But from wherever you stood in my new office, you'd only ever be able to see their inner faces. So, going back to the Shade function I selected each rectangle in turn and painted each outer face INV (which stands for invisible). Now the computer would only draw the rectangles from the point I could see them. Because there were also two intruding walls in the office, I shrank the walls that joined them (from the Edit function), so that no wall extended behind any other. But it was when I attempted to put the door in that I got lost in virtual reality...
As I've already mentioned, the 'entrance' was generated along with the area. It was right in the centre, 5o I used a Reset control to put me back in the middle of the area. I was moved instantaneously but the centre of the area was now outside the office. I was somewhere on the other side of the two L-walls. But the genuinely spooky part was that I'd just made all the walls invisible from this side, so when I tried to move back into the room, I heard a sound effect like a grunt as I bumped into the invisible rectangles blocking my path. Talk about not looking before you leap. I felt my way along one of these invisible walls until I got to a join.
Then using Edit/shrink, I forced the edge of the wall away and squeezed through the gap back into the office: When I turned around, I could clearly see the doorway I'd made and closed it behind me by stretching the rectangle to seal the gap again. Maybe it *wasn't* time to make an exit.
I went on to make the desks and computers out of cubes, editing them with the same controls that had made the rectangles into walls. It didn't take long.
3DCK doesn't take advantage of the extra memory of a C128 and there's only 5K working space when you load it on the C64. But all the work I'd done only added up to a handful of bytes and there's certainly room enough to design a decent sized adventure. And with games in mind, there's just time to describe a few of the Kit's other features.
You can attach 'sensors' to objects so that they respond to interference during a game. A sensor can contain an instruction for an object to disappear if it's shot, for example. You can also design an overlay screen with an art package so that a game has its own direction controls when it's run independently of the Kit. Incorporating finishing touches is easy, as I'll show you next month when we have another look at 3DCK.
This isn't a normal PowerTest but then 3D Construction Kit is by no means normal itself. But be certain of this: It's A Corker!

