Personal Computer News
 16th February 1985
Author: Stuart Nicholls
Published in Personal Computer News #099
Put some movement into your Spectrum's sprites with this machine code routine from Stuart Nicholls. Follow his instructions and you could design your own professional-looking software games full of spritely animation.
Spritely Movements
Put some movement into your Spectrum's sprites with this machine code routine from Stuart Nicholls. Follow his instructions and you could design your own professional-looking software games full of spritely animation
A major shortcoming of the Spectrum, as far as Basic games programmers are concerned, is the lack of computer controlled sprites. It is virtually impossible in Basic to keep track of more than three objects moving simultaneously around the screen and maintain a reasonable playing speed. However, this can be simply rectified with the following machine code routine.
It keeps track of up to 16 on-screen sprites at any one time using a set of user definable sprite parameters to govern speed, direction, bounce, etc, of each sprite.
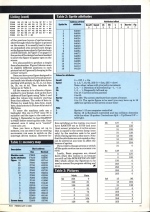
Although the machine code takes up under 1K you must allocate a further 10K for data comprising a screen dump (6K) and for 16 figures of 1/4K each. If you look at Table 1, you will see how the memory is allocated and you will notice a further block of data called Sprite Attributes at address FA00h (64000d) which, for Basic programmers, is the most important part of the whole program: it is this block of memroy that is used to monitor the sprites.
Table 2 shows a further breakdown of this area of memory and gives details of the Sprite Attribute functions and values. For example, suppose you require a sprite to move quickly left to right across the screen and to bounce off a RED INK/WHITE PAPER object you should set up SPRITE 1 ATTRIBUTES as:
| POKE 64001,0 | Very fast |
| POKE 64002,0 | No vertical line movement |
| POKE 64003,1 | Start by moving left to right, i.e. column increasing |
| POKE 64004,L | The value of L will depend on the screen position you wish to start from. Movement is half character square so that LINE values have a range of 0 to 47 |
| POKE 64005,C | Again this is the column start position and has a range of 0 to 63 |
| POKE 64006,58 | Attribute for INK RED/PAPER WHITE |
| POKE 64006,FIG | You may select from any of the 16 figures you have previously placed into memory (range 0 to 15) |
Once the sprite attributes are set up, it is a simple matter to switch the sprite on, and make it appear on the screen, with POKE 64000,1
Now you can forget about it as it will go on merrily bouncing from side to side (with a wrap around screen if only one obstacle is put in its path) without needing any more Basic commands: the program is interrupt-drive, leaving you free to continue with any Basic programming.
Sprite attributes may be changed at any time to give an increase in speed, or a diagonal movement, which will give a realistic bounce of a predetermined screen attribute, or you could even change the figure used.
The computer may control the sprites, but there is an exception to this with sprite 16, whose direction is controlled from keyboard using keys Q/A for Up/Down and O/P for Left/Right (anyone with a knowledge of machine code may change the program to use other keys). This sprite bounces off a preselected screen attribute and also has collision detection. That is, if sprite 16 collides with any other sprite, the computer detects this, and it's easy to control this from Basic.
PEEK 23728 = 0 for NO HIT
PEEK 23728 = 1 for HIT
The method I have chosen for designing figures is different from the normally used in that each sprite occupies its own screen layer. So if all 16 sprites are on the screen together the screen is built up of 17 layers including the original screen. This means a lower numbered sprite occupying part of the same screen area as a higher number will be covered, but if you use a special masking techniques parts of the lower number sprite will show through.
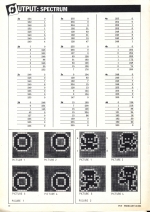
All sprites, however, take on the screen attributes. Because we are using half character square movement, we must produce four separate pictures for each figure. Figure 1 is a simple open shape design and shows clearly the requirements of the four pictures. Picture 1 occupies the top LH 1 1/2 character squares with a one pixel margin, picture 2 the top RH 1 1/2 character squares and so on. (See page 15.)
Note, however, that each picture is composed of a black area for the design and a grey area which defines the masked area for the design, i.e. how much of the previous layers of sprites/screen show through when the figure is printed on the screen. It is usually best to leave an unmasked area around each design so the figure shows clearly if printed onto a solid ink block. In Figure 1 (on page 15) the centre of the design has been mased to allow the figure to appear open on the screen.
It is also possible to produce a simple form of animation. Figure 2 shows a man in slightly different positions in each picture but still generally keeping to the correct 'corners'.
Once you have your figure designed in this way you need to convert each picture and mask into blocks of eight data bytes starting with picture 1a, 1b, 1c, 1d, then 2a, 2b, etc to 4d. Then tabulate the values as in Table 3.
All the remains is to allocate a figure number to your design, look up the start address of that figure using Table 1 and poke the values into memory starting from that address. The order of data is: Picture 1a: mask byte, data byte, mask byte, data byte, etc to Picture 4d a total of 256 bytes.
To enter the machine code use a hexloader (the one in PCN issue 95 is suitable) and the type in the code as in Listing 1. Remember to clear RAMTPO to 64255 before entering this code. Once entered, save it using SAVE "control" CODE 64256,699
Once you have a figure set up in memory, you can test it out by entering RANDOMISE USR 64930 to switch on the interrupt-drive routine. However before switching on the routine you must have RAMTOP set to 53759 and your 'start screen' printed as it is this screen that is copied to the screen dump (once only) by the machine code to be used when erasing sprites as they move. Note that the attributes are not copied so they can be altered at any time to affect the bounce of sprites.
If you wish to change screens or switch off the sprite routine use RANDOMISE USR 94948
Lastly, Basic programs are slowed down when this routine is on because you still call the ROM KEYSCAN (RST 38h) which allows the Spectrum to be used as normal for program editing and so on.
Values for Attributes
| On/off | 0 = Off, 1 = On |
| Speed | 0, 1, 3, 7, 15, 63, 255 (0 = fast, 255 = slow)
Note: Other values will give jerky movement |
| LA | 1, 0, -1: Direction of movement e.g. -1,-1 is |
| CA | 1, 0, -1: Diagonally left and up |
| L | 0 to 47: Current screen position |
| C | 0 to 63: |
| Barrier | 0 to 255: The screen attribute that causes a bounce |
| Fig | 0 to 15: The sprite figure to be used (you may have up to 16 different sprites on the screen at any time) |
| Note | |
| 1 | Sprites 1-15 are computer-controlled |
| 2 | Sprite 16 is Keyboard controlled and has collision detection with the other 15 sprites. Controls are Q/A - Up/Down, O/P - Left/Right |
This article was converted to a web page from the following pages of Personal Computer News #099.


