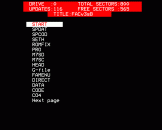
Disk Analyser
Files:
$.Analyse
T.Anatxt
This program has many uses. It could, for example be used as a sophisticated automatic disk menu, with easy cursor-key selection or it could be used for general 'Disk Handling' ie renaming files, locking & unlocking files.
Before I start to explain how to use the Analyser I suggest that you go and try it first. You'll find it quite self-explanitory, and once you've used it you'll know what it does, and we can go into the fine details and the hints on use.
Welcome Back
You will now have seen that the Analyser prints up a list of files from the disk (you may also have noticed that if there are more than 15 files on the disk there are two pages of files). Each file is selected by pressing RETURN, and as well as selecting files, you can also change the current drive, simply by using the cursor keys and pressing RETURN.
On pressing RETURN, the filename, access status, load address, execution address, file length and a list of load options are shown (e.g. CHAIN if the file is a BASIC program). Also shown is an option for another *command (DELETE and DUMP are the ones I use most) and an option to return to the main menu. After a * command the program returns to this file info. page (except if the command is DELETE when the program tries to return to this page, but can't find the file (it has been DELETEd) so FILE NOT FOUND is printed, and the program returns to the main menu. You may have noticed that on this file info page you can position the cursor over the access status (locked or unlocked) and press RETURN to toggle the status. If the file is unlocked, you can also position the cursor over the filename to change it; first type the directory letter, then the filename (The dot is typed for you after you have typed the directory letter).
If you are dealing with a text file, a useful facility of the program is the *TYPE routine, as well as *TYPing in mode 7, there is an option to *TYPE in any mode required, with scroll/paged mode and hard copy options as well. In this respect, the program can be used for Text File Display, and printout.
I began to write this program about a year ago, as an automatic disk menu, I was disappointed with most automatic menus as I wanted cursor selection (as opposed to numerical selection). After writing the core of the program, I decided that, rather than just jumping straight into a loading sequence, why not confront the user with file details, and let him decide what to do. After adding this, I decided that the program was no longer a menu, but a disk analyser.
One of the other original reasons for writing my own menu was that no other automatic menu I knew of could remove control codes from filenames and disk titles on protected disks (The most common being CHR$(21)). Most menus will simply hang up on a protected title or filename. The Analyser will go as far as displaying any rogue filename in the menu, but cannot access the file (due to the DFS bad name error).
An interesting built-in file 'hider' is to put the file in directory 0, the Analyser ignores all files in this directory. If you are using the program as a menu, any files you need to be left out should be put in directory 0.
Whilst writing the program I discovered that many of the routines (particlarly the text file display routine) required as much memory as possible. For this reason, the program has been compacted, and so is impossible to read (good luck to all hackers).
The program was never intended to work with the ADFS, and I doubt very much if it does. If anyone out there wants to write an ADFS version, go ahead, I have no intention of doing so myself (Just as long as you send it to Fast Access).
Happy analysing!


 14th December 2023

